
Thursday, July 19, 2012
Sneak peak
Here's a little peep show for our up coming birthday party at our house. Finding gold Easter eggs online wasn't cheap so I found plastic eggs at my local thrift store and gold spray paint look just as good. Stay tuned to see how we use these little cuties.

Friday, July 6, 2012
Christmas in July
Our annual trip is almost coming to a close. It's been hard to pick our favorite thing so far. But if you ask the kids, it would probably be our Christmas in July night. All the kids re enact the nativity from Luke 2. With only 4 kids this year, we were short a Mary, but nana stepped in to fill the roll. We then have a gift exchange. The adults do a nice white elephant gift exchange. The kids buy a gift for another cousin and nana and papa give a gift too. But this year, we had a special guest. Santa arrived to give a small gift to each child and it was so fun to see the look in their eyes. Truly the magic of believing. My 7 year old couldn't decide who he was and kept going back and forth. But finally came to the conclusion that he must have been the real thing. 
Saturday, June 30, 2012
Pumpkins in June?
 We compost around here and so when my husband planted our grapes during early spring we used compost. When things started heating up we found that we were going to have some sort of squash. So we retransplanted them and nourished them. Imagine my surprise when I found a pumpkin! I've tried to grow pumpkins in Phoenix for years now and the year I don't try I actually get one. How fun. To bad it came up in June instead of October!
Friday, June 29, 2012
Patio Furniture Redo
 I've had this cute cafe set for about 5 years now. It was in my grandmother's condo and after she passed away it came to live at my house. Our hot Arizona sun and heat has taken a turn on this cute set and I finally got tired of looking at it. I picked up a can of rust oleum hammered spray paint in brown and sprayed away. Please excuse the dusty mess. We had a haboob (a fancy word for a dust storm) go through and it's made everything a mess. I'm loving the change. Just one small step to get my backyard ready for the fall when we can actually use it again without dying of heat.
Sunday, August 7, 2011
Lego Birthday Party
We took the summer off around here. Too much happening all at once. One thing we did was have a Lego Birthday Party for my 6 year old. We invited 6 friends. Wish I had an invite to show, but forgot to take a picture. But they did look like lego bricks, rectangular with cirlces punched out on top and LEGO stamped on each circle.
 We built an entire lego city from Legos that my brothers and I played with as kids. Because we had 7 little boys we didn't want the city too big. It was easier to move around. We had a beach, police station, airport, horse ranch, 2 houses and a dock. We had all of our loose legos off to the side so they could build cars and other creations.
 We played "Stamp the face on the Lego Guy". Each boy was given a different face. They copied their face onto a 6" yellow circle with markers. This was fun as each face was totally different. We then blind folded them and had them stamp the
 lego guy's face on. We removed each face after each turn. The boys laughed so hard to see their faces end up somewhere other than the yellow part.
I made the lego guy out of card stock and found a lego guy on the internert. It was then glued onto a full size poster board. I had the lego stickers from a scrapbook store in Poway, California.

For the cake we did cupcakes. I had the Cupcakes made by CalebCream. They are based out of Phoenix, so when they have a sale, I would totally recommend them. We ordered chocolate with buttercream frosting. They boys couldn't wait to eat theirs.
I had  another friend design the cake toppers and they were printed at Wal-Mart to save me time and ink. I cut them to size, rounded the corners and then glued them on to 2 inch scalloped squares I cut from my cricut. I then glued a toothpick on the back. I will say, these cake toppers were a big hit. All the boys wanted to take theirs home.
 another friend design the cake toppers and they were printed at Wal-Mart to save me time and ink. I cut them to size, rounded the corners and then glued them on to 2 inch scalloped squares I cut from my cricut. I then glued a toothpick on the back. I will say, these cake toppers were a big hit. All the boys wanted to take theirs home.
I used my glass jars from Hobby Lobby and filled them with loose Lego bricks. The big lego guy is from Legoland. I put everything on the green Lego squares
I bought the yellow plates, oranges napkins and blue silverware at Wal-Mart. I used a sharpie to draw a Lego face on the plates. I used Juice boxes from Cost-co and used green card-stock and a 1 inch circle punch with foam dots to make them look like a Lego brick.

 For the food we did mini rolls, lunch meat, cheese puffs, cheese and lots of fruits and veggies. I wanted to have colorful food. The cheese puffs were a big hit, but the carrots and celery, not so much.
 Finally for the gift bags, I used 8 x 10 size bags I bought at Michaels. I cut 4 inch circles and adhered them with foam tape. I used just the yellow, orange and red bags. I filled them with Lego Club Jr. magazines I was able to pick up for free at the Lego store at our local mall. I put two of them in there as I went twice and got two different months. I also put in a solid colored bouncy ball I bought at the Dollar Tree. I found mini note pads in orange and found mechanical pencils in primary colors also at the Dollar Tree. I tied them all up with a colorful dot ribbon. I then found some Legos on clearence after Easter to put into their bags. I had been planning since before Easter for this Summer birthday party. I found brick candies at the mall and just put them in a cello bag with a tag that said they were brick candy. I also made Lego Guy crayons. I bought my mold at the Lego Store and used all our old crayons. I made them solid colors and put them in a bag with a tag around them. Each bag probably cost around $3. The bulk of that price was the clearence Legos I bough at $2 a piece.
Each boy was so excited to pick their bag. I used the bags as decorations until it was time to leave. I also found plastic primary colored banners pennets from the Dollar Tree to decorate with. Over all it was a huge success. The only thing I was not prepared for was the parents who stayed at the birthday party.
Tuesday, April 5, 2011
How does your garden grow?

I didn't think that a year ago that we would have a garden ready in time to plant anything. We didn't for a time, but both husband and I were getting antsy. (Did you know that we are certified master gardeners?) So last fall, we tilled and worked the ground. What a pay off to finally see the results of our labor. This is the second round of broccoli we have had since planting the plants. Love it. Next up, watermelon, tomatoes, herbs, peppers, onions and carrots.

Tuesday, February 8, 2011
Make Up bag

Yesterday I spent making this cute little bag. I love it, its perfect. I think I want to use it for a small purse. Its completely lined inside, has a zipper, which I'm thinking I need to take a class on how to put in a zipper. But none the less, I love this. I love the fabric, which I found a thrift store. Since I want to use it as a small purse, any ideas of where to find a tutorial on making a cloth wallet?
Monday, February 7, 2011
Card Swap
 Have you hosted a card swap yet? I can't begin to say enough about the amazing talent of some ladies. Absolutely wonderful and fun to be with. This past Saturday found my dining room and living room completely re-arranged to make room for 9 ladies and 11 cards. I wish I had thought to take a picture of everything in full swing, but I was having way to much fun working on all the cards. We definitely had a variety of skills which is great because not everything looks the same.
Check out these two great cards made by a pair of sisters.


Don't you just love the space ship paper?

Love all the glitter paper on this one.

I definitely can see a cute tween girl making a wish on this card.

Can you believe that this is all fabric scraps? Wish I had thought of this one.

A-m-a-z-i-n-g is all I can say.

Stickles was a necessity on birthday cards and adding it to butterflies was brilliant.

Love the colors of this one.

I'm ashamed to claim this as my card, after seeing everyone else cards, I felt mine was so plain.

Tuesday, February 1, 2011
Laundry Room Bead Board

We finally put up the bead board. Only problem is, no chair rail, yet. My gift card from mother day to Lowe's covered just enough to buy the bead board and a package of paint rollers. So next paycheck we will finally get the chair rail and paint.
If you haven't used an air compressor nail gun, I would highly recommend such a fun tool. A little scary at first, but totally fun.

We really had no idea what we were doing and just sort of went for it, I'm sure I should have done all sorts of research on the best things to do, but I was impatient and I've waiting for this since we first moved in. None the less, I very much love it.
Thursday, January 27, 2011
I spy bags
We have lots of little "stuff" from around our house. Whether its from art projects or birthday parties or what ever, we have "stuff". If it were up to me, everything would end up in the trash. So to appease my son (and myself), we came up with this idea. The perfect way to have things and make them useful.
What you'll need:
Plastic vinyl
thread
sewing machine
eyelets
doll pellets
about 20-30 little odds and ends
I got heavy duty plastic vinyl from my local fabric store, cut it to a 7x7 square.

Then I choose fun colorful thread, used a 1/4 inch seam allowance and sewed the complete square except for a 2 inch opening. At this point, I just pulled the thread out, but did not cut it. I wanted a continuous line.

I stuffed the odd and ends inside then filled the square up about 2/3rds full of doll pellets. If you want a list, be sure to write it all down so you can remember.


Stitch the square closed.

I then put a second decorative stick around the outside. This helped add further strength to the seams and a cool decorative twist. At this time you can use an eyelet and ribbon to attach the list.

I typed out the list using a business card template and size 10 font. I then laminated the list. I attached the list to the I spy bag.

Its been perfect for Church, car rides and quiet time.

What you'll need:
Plastic vinyl
thread
sewing machine
eyelets
doll pellets
about 20-30 little odds and ends
I got heavy duty plastic vinyl from my local fabric store, cut it to a 7x7 square.

Then I choose fun colorful thread, used a 1/4 inch seam allowance and sewed the complete square except for a 2 inch opening. At this point, I just pulled the thread out, but did not cut it. I wanted a continuous line.

I stuffed the odd and ends inside then filled the square up about 2/3rds full of doll pellets. If you want a list, be sure to write it all down so you can remember.


Stitch the square closed.

I then put a second decorative stick around the outside. This helped add further strength to the seams and a cool decorative twist. At this time you can use an eyelet and ribbon to attach the list.

I typed out the list using a business card template and size 10 font. I then laminated the list. I attached the list to the I spy bag.

Its been perfect for Church, car rides and quiet time.
Wednesday, January 26, 2011
A New Start for a New Year
Goodness, we're already half done with January. The Holidays hit and something had to give, unfortunately it was the blog. But that doesn't mean we have stopped working around here on Park St. No sir, we've been busy. 


Like painting the Laundry room. You'll notice that its only half done, I'm waiting for the husband to show me how to use the new nail gun he got for Christmas so I can put up the bead board.

We've also added our new garden plot and peach tree to the back yard. (Why oh why did the previous owners put in 3 inches of rock? Took f.o.r.e.v.e.r. to remove.)

I've been busy recovering my craft room chair too. (I'll post my before and afters in a few.)

Let's not forget the great transformation of the front yard planter. I {heart} flowers.

Now that we're back in full swing, check back often to see what I've been up too. The next few weeks include a birthday card swap with 10 other great and talented ladies, the finishing of the laundry room, repainting the dining room and finally finishing the TV armour for the play room. Phew, I'm tired just thinking about it all. But off we go to a grand adventure into turning my home into a dream.
Monday, November 22, 2010
Ribbon Tree

With the holidays just around the corner, I'm dying to start decorating for Christmas. (I have a no decorating till Dec. 1st policy, I mean, lets enjoy Thanksgiving first!) But I can always craft to get started on Christmas. I found the Styrofoam tree form at my local Dollar Tree. The ribbon and flat pins are from Wal-mart and white pins are from Hobby Lobby.
 Cut the ribbon into 2 inch strips. Mark off every 1/2 inch around the foam to ensure a uniform look. Layer the ribbon on top to cover.
  Fold ribbon in half, pin in place. I did burn the edges of the first layer to keep it from fraying. Then using my marks as a guide, I pinned ribbon in a straight line to make each layer. I used flat pins so you wouldn't see them.
 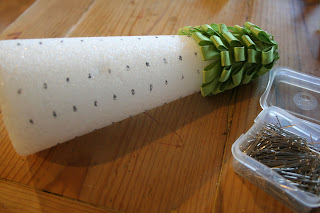 I used 2 rolls of ribbon, about 250 pins and it took about 2 hours since I was just making it up as I went. (I spent a lot of time burning the edges of the ribbon that I didn't need to do.)
 Cut the ribbon into 2 inch strips. Mark off every 1/2 inch around the foam to ensure a uniform look. Layer the ribbon on top to cover.
  Fold ribbon in half, pin in place. I did burn the edges of the first layer to keep it from fraying. Then using my marks as a guide, I pinned ribbon in a straight line to make each layer. I used flat pins so you wouldn't see them.
  I used 2 rolls of ribbon, about 250 pins and it took about 2 hours since I was just making it up as I went. (I spent a lot of time burning the edges of the ribbon that I didn't need to do.)
I put mine flat on the shelf, but I as soon as my decorations come out, I'll probably put in on a candle stick or something. Let me know if you make on too, I want to see what you've done.
Tuesday, November 16, 2010
Come what may and Love it.

These two crazy chicks are great and take care of all my vinyl needs. A few months back I over heard the first chick saying she wanted a "Come what may and love it" quote put up on her wall coming down the stairs. Perfect, I want one too. The first one they cut was too small for the space I was going to put it, so she cut me another one. They are great, I can say enough about these two. 


Now my only problem I face was how in the world do I put it up. My ladder isn't one of those fancy kind that can contort in a variety of shapes and sizes. So I had to think outside the box. A Box! That's it! I knew having a my food storage would come in handy.

So very carefully I climbed on up, adhered the vinyl and admired my happy saying.

Isn't it the perfect pep talk anyone can get before they head out and face the world?

I hope you don't mind the photography, my 3 year old was the only one home to take these pics.
Subscribe to:
Posts (Atom)